
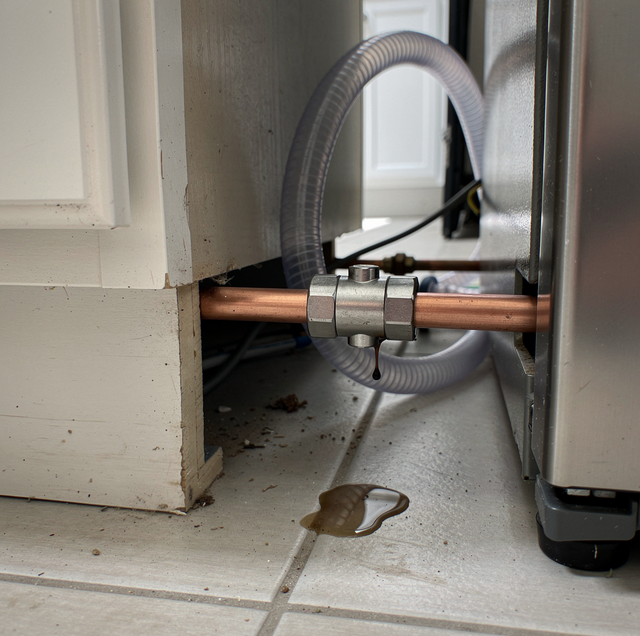
An ice maker line taps into a home's copper supply through a small fitting rather than a full branch of pipe, and on an older install that fitting can be a self-piercing saddle valve: two clamp halves that bolt around the copper, with a needle inside that punches through the pipe wall the first time the valve closes. Nothing about that connection relies on soldering or threading into the pipe itself. The seal keeping water inside the copper depends entirely on a rubber gasket compressed between the clamp and the pipe's outer wall, held there by the pressure of the bolts threading the saddle together. That gasket and the clamp pressure holding it are the only things standing between the supply and the outside of the pipe, which is why a leak at this connection shows up at the tap point itself rather than somewhere along the tubing running to the refrigerator.
Where the water shows up narrows down which part of the connection has let go:
| Where the Water Shows Up | What Has Likely Let Go |
|---|---|
| A drip forming under the clamp itself | The gasket and clamp seal at the saddle valve |
| A drip at the small nut on the valve's outlet | The compression fitting connecting the tubing to the valve |
| A wet spot on the line partway to the refrigerator | The plastic tubing, hardened and cracked along its run |
| Water that shows up only after the refrigerator has been moved | A kink or a pulled connection from repositioning the appliance |
| A drip at the refrigerator's own inlet, not the tap | The fitting where the tubing meets the appliance |
How a Saddle Valve Seals, and Why the Gasket and Clamp Loosen With Age
A saddle valve holds its seal through clamp pressure alone. Two bolts draw the clamp halves together around the copper, squeezing the gasket against the pipe's curved surface hard enough to keep pressurized water from finding a path around it. Every part of that seal is mechanical, which means it can also relax over years of service.
Small, repeated movements work at the bolts: the jolt through the line each time the refrigerator's water inlet valve snaps shut, and the slight expansion and contraction of the pipe as the water inside it changes temperature. None of those forces is strong enough to undo a bolt in a single event, but small losses of clamp tension add up to a clamp that no longer compresses the gasket as it did when it was installed. The rubber gasket ages on its own timeline, too, losing the elasticity that lets it spring back and reseal itself during the small movements the clamp allows. Once it's compressed flat and stays that way, the seal depends entirely on the bolts holding tight, and a slightly loose clamp is where the first drip starts.
A saddle valve that has started weeping at the clamp is not fixed by tightening the bolts further. A gasket that has already lost its shape does not regain it under more pressure, and pushing the clamp harder against a copper wall that has been pierced can crack the thin pipe wall around the hole.
A white or green crust around the saddle clamp indicates a slow weep that evaporates before it can drip, and the crust forms where the gasket has already let water past.
The Compression Connection at the Valve Outlet
On the outlet side of the saddle valve, the tubing running to the icemaker connects through a compression fitting rather than the clamp-and-gasket seal on the pipe side. A nut threads onto the valve's outlet; a metal sleeve bites down onto the tubing as that nut is tightened; and, on plastic tubing, an insert slides inside the tubing first so the wall doesn't collapse when the sleeve closes around it. If the nut never fully seated when the line was connected, or the insert was left out, the leak shows as a drip at the nut itself.
This connection is also the end a homeowner or a mover touches when running or rerouting the tubing, since it's the accessible end of the line. A nut that was hand-tightened once and never checked again can be where a leak first appears, before the valve on the pipe side shows any sign of wear.
Plastic Tubing That Hardens and Cracks With Age
Where the tubing from the valve to the refrigerator is plastic, it spends years routed behind or beneath an appliance that runs warm. Plastic loses flexibility as it ages, and the line running to an icemaker is no exception: what starts pliable enough to coil and route around a cabinet corner gradually stiffens, and a stiff line under the same pressure that a flexible one handled without issue can crack. That crack can open anywhere along the exposed run, as well as at the fittings on either end, which is what separates this cause from a fitting that loosened.
A line that has hardened enough to crack mid-span shows other signs first: it no longer bends easily by hand, and it may have a visible discoloration or a chalky look where it used to be clear or uniform in color. Neither sign means the line is about to fail immediately, but either one is worth noting before the tubing is asked to flex again, since a line that has already stiffened is the one that can split the next time it's moved.
Lines Kinked or Pulled When the Refrigerator Is Moved
Pulling a refrigerator away from the wall to clean behind it or reach the valve puts a different kind of stress on the same tubing. A line with too little slack gets pulled taut the moment the appliance rolls forward, and a taut line can either kink sharply enough to restrict flow or pull straight out of the fitting at one end. Either failure can go unnoticed the whole time the appliance is out, since a kink doesn't leak on its own and a connection pulled partly loose can weep slowly behind the appliance, out of sight. The leak shows up once the refrigerator is pushed back into place and the line is asked to sit at its original angle again, which is exactly why this cause reads, on its own, as if the problem started the moment the appliance was returned to its spot.
Water pooled near the refrigerator's outlet is a shock hazard to anyone mopping or reaching behind the appliance. The plumber leaves the outlet alone and switches that circuit off at the breaker before anyone mops or moves the refrigerator.
A full-size refrigerator is heavy enough to be a two-person job on a dry floor, so it stays in place until the floor is dry, never dragged out across a wet one.
Why a Saddle Valve That Has Sat Open for Years May Not Close Again
A saddle valve feeding an icemaker stays open for the life of the appliance unless someone closes it, with house pressure held against its internal needle between icemaker fills rather than being cycled shut and open the way a household stop valve would be. Minerals in the water settle wherever flow sits still or moves slowly, and inside a valve body that has stayed in one position for years, deposits build across the threads and the seat the needle closes against. Corrosion on those same threads adds to the problem on top of any mineral buildup.
The result is a valve that resists turning when it's finally asked to close, or worse, one that turns freely without the needle reseating squarely against the hole it made. A handle that spins without ever stopping the flow has failed at the one job a shutoff exists to do, and forcing it further does not restore that seal, since the surfaces involved are the same worn ones that stopped sealing in the first place. This is why the nearest fixture stop or the house main, not the saddle valve's own handle, is the one to rely on when the leak needs to stop right away.
Replacing the Tap With a Proper Tee and a Dedicated Stop Valve
The lasting fix for a saddle valve that has started leaking, whether at the clamp, the outlet nut, or the valve's own closing mechanism, is to remove it from the supply line entirely rather than repair it in place. A plumber cuts out the section of copper carrying the pierced hole, installs a proper tee fitting in that gap, and adds a dedicated stop valve at the tee, built to be closed and opened repeatedly without the wear pattern that catches up to a valve meant to stay open for years. A new supply line runs from that stop valve to the refrigerator, replacing tubing that may have already hardened along with the connection it came from.
That approach solves more than the immediate leak. A dedicated stop valve gives the icemaker its own shutoff point that isn't relied on to also seal against house pressure the way a saddle valve's clamp is, and a fresh length of tubing removes the risk of a second failure showing up in a section of line that was already close to cracking on its own.
Frequently Asked Questions
No, and it makes the problem worse. The valve's own body and its internal gasket are what cover the pierced hole in the copper; take the whole valve off, and that hole is left open to the full flow of the house supply. The pierced section has to be cut out of the line or sealed with a repair fitting.
Not in the same way. A saddle valve is designed to pierce rigid copper; on PEX or CPVC supply lines, a tee fitting is cut into the line, since piercing plastic pipe does not provide a reliable seal.
Not as a lasting repair. A new gasket still seals under the same clamp that loosened once, around the same pierced hole, needle and stem, so every other aged part of the tap stays in service.
No. A shutoff built into the back of the refrigerator only stops water from moving further into the appliance; the length of tubing between that point and the copper tap stays fully pressurized.
Past finger-tight, but not aggressively torqued down. The nut is turned by hand until it stops, then given a further partial turn with a wrench to seat the sleeve against the tubing; tightening well beyond that point is what deforms the sleeve and pinches the tubing rather than sealing it.
Only if the copper at that point runs inside a finished wall, floor, or ceiling. An ice maker tap on an exposed run of pipe, behind the refrigerator or inside a cabinet or utility space, lets a plumber cut out the pierced section and install the tee without opening anything else.
Line up ice maker line repair — a new tee at the tap, a dedicated shutoff valve, and a new supply line to the refrigerator. Plumbing Professionals serves Pasadena, Altadena, South Pasadena, and surrounding areas. Call (626) 247-3401.